The following is going to outline all of the steps to setup auto login using several different methods. This can be useful for machines that are setup as a kiosk or in environments where there is only one user using the machine. Auto Login is idea for situations where you are operating in a secure environment, or where you are testing endless reboots and want auto login to get you to the desktop of the user faster and automagically!
Method 1: Using Autologon software
Microsoft has release a free application called Autologon that you can download to get Auto Login setup on the computer in just a couple of clicks. No installation is necessary as this tool is portable.
Download this tool from here and unzip the zipped folder. You should find a file called Autologon.exe. Double-click on it to open it. The username and domain fields should be filled in automatically.
You need to enter the password of your user account and click the Enable button.
Method 2: Using Registry Editor to enable Auto Login
NOTE: The steps below are to modify the registry of your system, if you are not comfortable making these changes or are afraid that you might not get the steps done correctly then you shouldn’t follow the steps below. These steps are provided to you with NO WARRANTY, I cannot be held responsible for any damage that might come from the changes suggested below.
Preparing for the Registry Settings
- Username – The name you would normally type in the logon box. It does NOT have to be an Administrator account.
- Password – OK this is the problem, you are going to expose the password in plain text, at least to the depths of the registry.
- DefaultDomainName – If the computer is joined to a domain then you will need to make an entry for this.
Instructions to Configure Auto Login with Regedit
- Open Registry Editor on your computer. Press Win + R, type regedit and hit the Enter button
- Navigate to this path:
HKLM\Software\Microsoft\Windows NT\CurrentVersion\winlogon
HKLM = HKEY_Local_Machine - Create a new String Value in the Winlogon key
Right-click in the right pane, New > REG_SZ (String Value), name it DefaultUserName
Set the string value to the password of the user account, for example “Pa$$w0rd” (this is case sensitive).
DefaultPassword = “Pa$$w0rd” - If the DefaultUserName value does not exist, then right-click in the right pane, New > REG_SZ, name it, DefaultUserName
Set the string value to the required UserName, for example SomeUser or Administrator (this is not case sensitive).
DefaultUserName = “SomeUser” - Optional Item: If your Windows machine has joined a domain, then create a String Value called DefaultDomainName
Right-click in the right pane, New > REG_SZ, name it DefaultDomainName
Set the string value to the domain that the computer is a member of, for example “domain.lan” (this is not case sensitive). Is this computer joined to a domain but you need it to login to a local account, then enter the name of the computer instead of the domain name
Set: DefaultDomainName = “domain.lan” to login to a domain account otherwise enter the computer name
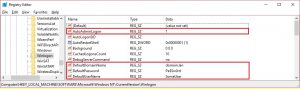
Here is a summary of the 4 registry REG_SZ values to enable Auto Logon
AutoAdminLogon = “1” Enabled (Zero would mean turn off)
DefaultUserName = “SomeUser” (Your logon username)
DefaultPassword = “Pa$$w0rd” (Remember this or change)
DefaultDomainName = “domain.lan” (if the account used for login is a domain account otherwise enter the computer name)
Disable Auto Logon in Registry
It’s easy to disable the auto login with regedit; you just need to find, then change AutoAdminLogon from 1 to zero. You can leave the other settings, especially if you change your mind later!